
Favorite Old School Technique: Wax Paper Resist | Collab with Delaney Jane Cardss & Courtney Kreeber
Hey Procraftinators! Today, I am back with another fun collab with Renee from Delaney Jane Cards & this month, Courtney Kreeber is joining us! How exciting! This month, our theme is favorite old school techniques and I chose to do Wax Paper Resist. I had so much fun that I made 16 cards in total, but I only show the finishing of 4 cards in my video. I will go over all the supplies used for all 16 cards here in my blog post for anyone that wishes to know those details. Here are the 4 cards that I finished on my video.


Dylusions Sprays

Oxide Sprays


Oxide Sprays
As you probably noticed, I did cut some of the backgrounds with background dies. This is what I did with the backgrounds that I didn't care for as much and you can see they still turned out great. So, remember, if you don't like a background, just die cut it! If you don't have a background die, try using a different die that you love and I am sure it will turn out stunning!
I hope you enjoyed my cards today! Don't forget to check out Renee & Courtney's videos. You can find those linked in my description box over on my YouTube video. As always, have a great day!

To do a wax paper resist, it's really quite simple. You cut a piece of wax paper just slightly larger than your card front. Then, you insert it into an embossing folder of your choosing and run it through your embossing machine. Another variation on this, is scrunching the wax paper up into a ball, then flattening in back out, placing it into your embossing folder and running it through your embossing machine. This will add a bit more texture than what the folder will add. Either way is acceptable and it just depends on what you like. If you haven't done this before, I suggest trying some both ways. Next, you take your wax paper and sandwich it in between 2 pieces of glossy cardstock that has been cut down to card panel size. The paper does have to be glossy.
This will not work with regular cardstock. The wax will just soak into
the cardstock and will not resist. You don't have to use two pieces, if you don't wish to get the negative image. However, I enjoy getting a 2 for 1 deal out of these cards. So, I choose to do 2. Sometimes, the negative doesn't turn out so great, but we will talk about what to do with those backgrounds later. Once you have sandwiched you pieces, stick them into a piece of computer paper that has been folded in half. This is so you protect your iron and ironing board from getting waxy. Next, take your heated iron and iron over the whole thing. I had mine set on cotton, I believe. You don't want to over heat your piece, so keep an eye on it. I just lifted the corner of mine and checked after a couple of times going over it. If you can see a waxy design on
your card fronts, then you are good to go. After you get all your card fronts ironed, next comes the fun part, applying the color for the resist part of the technique.


Distress Inks


Distress Ink Resist
This is how I first learned this technique. Once the wax has been applied to the glossy paper, you ink blend dye inks onto the glossy paper. You could also brayer them on, if you like. However, I never think to do that technique. I am an ink blending junkie, so that is how I do it. I did 4 cards with this technique.

Distress Inks
Spellbinder - Hip Hip Hooray Dies - Only used the "Hooray"
Simon Says Stamp - Birthday Word Mix 1 Stamps (small heart secondary front sentiment)
Simon Says Stamp - Word Mix 1 Dies
Simon Says Stamp - Word Mix 1 Dies
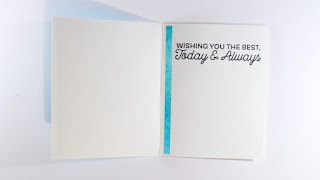
My Favorite Things - Big Birthday Wishes Stamp Set (inside sentiment)

Distress Inks
Craft Bundles.com SVG - Brave & Strong [RETIRED]
Nuvo - Aqua Shimmer Pen in Glitter Gloss
Nuvo - Aqua Shimmer Pen in Glitter Gloss


Distress Inks
Simon Says Stamp - Birthday Word Mix 1 Stamps ("Celebrating You" sentiment on front)
My Favorite Things - Big Birthday Wishes Stamp Set (inside sentiment)


Distress Inks
Simon Says Stamp - Birthday Word Mix 1 Stamps (Let's Celebrate sentiment on front)
Simon Says Stamp - Word Mix 1 Dies
Simon Says Stamp - Word Mix 1 Dies
My Favorite Things - Big Birthday Wishes Stamp Set (inside sentiment)
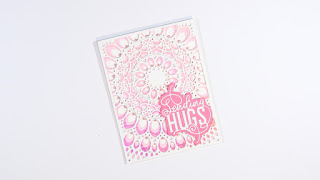
Distress Oxide Resist
This is obviously similar to the Distress Ink Resist, but when this technique came out, Oxides did not exist. So, I thought it would be fun to see how they played with this technique.


Distress Oxides
Spellbinders - Cabbage Rose Embossing Folder [RETIRED]
Tonic Craft Kit #30 "Hello" circle die cut [RETIRED]
Concord & 9th - Darling Petal Turnabout Stamp Set ("Friend" secondary sentiment)
Altenew Lace Up Stamp Set (inside sentiment & hearts) [RETIRED]

Distress Oxides
Quickutz/WRMK Tide Embossing Folder (Set of 2) [RETIRED]
Tonic Craft Kit # 31 ("Celebrate" Die Cut on front) [RETIRED]
My Favorite Things - Big Birthday Wishes Stamp Set (inside sentiment)
Nuvo Glitter Drops - Yellow Bird & Dazzling Blue


Distress Oxides
My Favorite Things - Big Birthday Wishes Stamp Set (Inside Sentiment)


Distress Oxides
Tonic Craft Kit #21 - Have a Lovely Day [RETIRED]
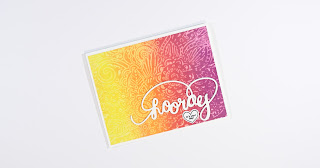
Dylusions Spray Resist


Dylusions Sprays
Houndstooth Paper Scrap from a past project
My Favorite Things - Big Birthday Wishes Stamp Set (inside sentiment)


Dylusions Sprays
Pink & Black Cardstock Scraps from stash
My Favorite Things - Big Birthday Wishes Stamp Set (Inside Sentiment)


Dylusions Sprays
Neat & Tangled - Nesting Hexagon Cover Plate [RETIRED]
Black Scrap of Cardstock
My Favorite Things - Slanted Sentiment Strip Dies [RETIRED]


Dylusions Sprays
Simon Says Stamp - Birthday Word Mix 1 Stamps (Front Sentiment)
Simon Says Stamp - Word Mix 1 Dies
Spellbinder Sew Sweet Trims Dies
Simon Says Stamp - Word Mix 1 Dies
Spellbinder Sew Sweet Trims Dies
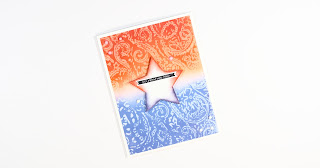
Oxide Sprays


Oxide Sprays
Quickutz/WRMK Tide Set Embossing Folder [RETIRED]
Tonic Craft Kit #19 "With Love" Die Cut [RETIRED]
Altenew Quilled Elegance Stamp Set (inside sentiment & heart)
Pearlescent Vellum

Oxides Sprays
Fun Stamper's Journey - Persian Garden Background Die
Tonic Craft Kit #21 "Have a Lucky Day" Die
Altenew Quilled Elegance Stamp Set (Inside Sentiment)
Nuvo Crystal Drops - Auburn Pearl
Memento - Tuxedo Black Ink
Memento - Tuxedo Black Ink

Oxide Spray
Spellbinder's Cabbage Rose Embossing Folder [RETIRED]
Fun Stamper's Journey - Asian Lattice Background Die
Craft Perfect - Gleaming Lilac Pearlescent Card
Tonic Craft Kit #22 - Sending Hugs Die
Altenew Quilled Elegance Stamp Set (Inside Sentiment)
Dream Drops - Super Nova

Oxide Sprays
Pink & White Cardstock Scraps from stash for layering A & C layers of background die
Tonic Craft Kit #22 - Sending Hugs Die [RETIRED]
Altenew Quilled Elegance Stamp Set (Inside Sentiment)
Dream Drops - Super Nova [Tonic Craft Kit Exclusive Color - RETIRED]
As you probably noticed, I did cut some of the backgrounds with background dies. This is what I did with the backgrounds that I didn't care for as much and you can see they still turned out great. So, remember, if you don't like a background, just die cut it! If you don't have a background die, try using a different die that you love and I am sure it will turn out stunning!
I hope you enjoyed my cards today! Don't forget to check out Renee & Courtney's videos. You can find those linked in my description box over on my YouTube video. As always, have a great day!
If you enjoyed my video/blog post today, I would greatly appreciate it if you followed me on social media.
Facebook: fb.me/RiseAndProcraftinate
Instagram: https://instagram.com/riseandprocraftinate
Pinterest: www.pinterest.com/RiseandProcraftinate
***I buy all of my supplies myself and am not affiliated with any company. The links I provide are not affiliate links. I do not make a commission when you buy using these links. They are merely for your convenience or clarification of which supplies I have used. I do not guarantee they are the cheapest prices. I suggest you do your own research and shop around.***
Comments
Post a Comment