Hey Procraftinators!
Today, I have a fun collab with Janie The Craft Princess and we are playing with embossing powder. I will be sharing 3 old, but good techniques. I will admit that I wasn't completely happy with the final product of my card, but that doesn't mean that the techniques aren't still worth showing. It just means that I wasn't completely satisfied with the choices I made when making my card. It happens sometimes to all of us and I just didn't have time to make a different card.
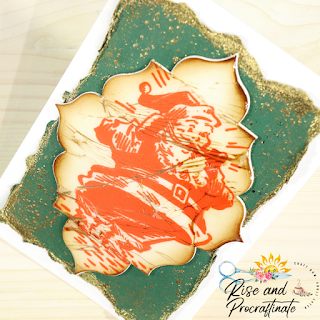
Let's start by showing the final card and I will go over the techniques I used on it.
The first embossing powder technique that I did on this card is the cracked glass technique. It's where you cover an image in versamark or whatever your preference of embossing ink is and then cover it in layers of thick clear embossing powder. You can use a regular clear clear embossing powder, but it will take you more layers. Once it has gotten super thick, you stick it in the freezer to get cool and hard and then you crack it. You literally crack it, by bending the cardstock. As you can see in my final photo here, the Santa image is cracked, like cracked glass. You can take an ink pad (I used vintage photo) direct to your cracked glass piece to make those cracks stand out more. When the ink gets in those cracks, they really stand out.
My second technique is called scorching and deckled edge. I started by taking a water brush and scribbling it on the edge of my cardstock to loosen the fibers of the cardstock. Then, I ripped along the wet edge. To distress the edge more, I took my Tim Holtz Paper Distresser tool and went along those edges to really rough them up. After I was satisfied with how distressed the edges looked, I took my Versamark pad and ran that along the edges and pour gold embossing powder over that. I purposefully did not use an antistatic powder tool because I wanted my embossing powder to be messy along this panel. Next, I heat set the powder and I purposefully scorched the powder. Normally, we would not want to scorch the powder, but this give us more interest and texture the the edges of the panel. You can see the texture of the torn edges much more through the embossing powder.
My third and final technique on this card is embossing with water. I splattered some water on my panel and then poured embossing powder over the wet panel and heat set that.
If you wish to see these techniques in action, I have a video showing all these techniques making this card. Be sure to check that out.
Be sure to check out Janie's video too!
Supply List
- Tim Holtz / Stamper's Anonymous - Christmas Memories Stamp Set
- Spellbinders - Labels 56, Nestabilities Die Set
- VersaFine Clair - Tulip Red
- Distress Ink - Vintage Photo
- VersaMark
- The Personal Stamp Exchange - Clear Enamel Embossing Powder
- The Personal Stamp Exchange - Gold Embossing Powder
- Tim Holtz Paper Distresser


Comments
Post a Comment